
Create an Azure Databricks Workspace with an External Hive Metastore – Data Sources and Ingestion-1
- Log in to the Azure portal at https://portal.azure.com ➢ enter Azure Databricks in the search box ➢ click Azure Databricks ➢ click the + Create button ➢ select the subscription ➢ select or create a new resource group ➢ name the Azure Databricks workspace (I used brainjammer) ➢ select the region ➢ select Pricing Tier Premium (consider using the trial version) ➢ click the Next: Networking button ➢ leave the default setting ➢ click the Next: Advanced button ➢ leave the default setting ➢ click the Review + create button ➢ and then click Create.
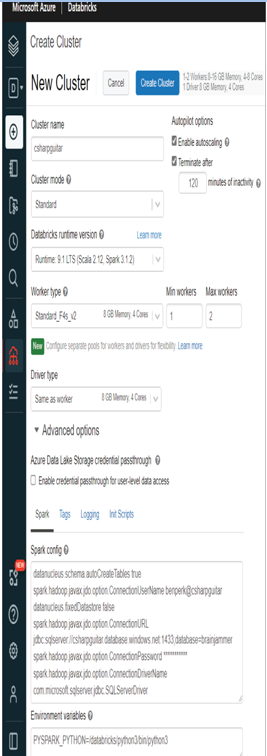
- Once the Azure Databricks workspace is provisioned, navigate to it ➢ click the Open link on the Overview blade in the Launch Workspace tile ➢ choose the Compute menu item ➢ click Create Cluster ➢ name the cluster (I used csharpguitar) ➢ choose a worker type (consider a low spec one like Standard_D3_v2) ➢ change Min Workers to 1 and Max Workers to 2, to save costs ➢ expand the Advanced options ➢ and then add the following seven lines of text into the Spark config text box:
datanucleus.schema.autoCreateTables true spark.hadoop.javax.jdo.option.ConnectionUserName userid@servername datanucleus.fixedDatastore false spark.hadoop.javax.jdo.option.ConnectionURL jdbc:sqlserver://*:1433;data base=dbname spark.hadoop.javax.jdo.option.ConnectionPassword * spark.hadoop.javax.jdo.option.ConnectionDriverName com.microsoft.sqlserver.jdbc.SQLServerDriver
The text is located in the Chapter03/Ch03Ex14 directory on GitHub at https://github.com/benperk/ADE. The file is named AzureDatabricksAdvancedOptions.txt. Update the text with your details, as described in the next step.
- To find the values for ConnectionUserName, ConnectionsURL, and ConnectionPassword, navigate to the Azure SQL database you created in Exercise 2.1 ➢ choose the Connection String navigation menu item ➢ and then select the JDBC tab. The required data is provided in the necessary format in the rendered connection string.
- Still on the Azure SQL database, select the Overview navigation menu item ➢ select the Set Server Firewall link ➢ set Allow Azure Services and Resources to Access This Server to Yes ➢ enter a rule name (I used All) ➢ enter 0.0.0.0 as the Start IP and 255.255.255.255 as the End IP ➢ and then click Save.
- Navigate back to the Azure Databricks workspace ➢ place the contents of your updated AzureDatabricksAdvancedOptions into the Spark config text box ➢ and then click Create Cluster. The configuration should resemble Figure 3.65.
FIGUER 3.65 An Azure Databrick cluster
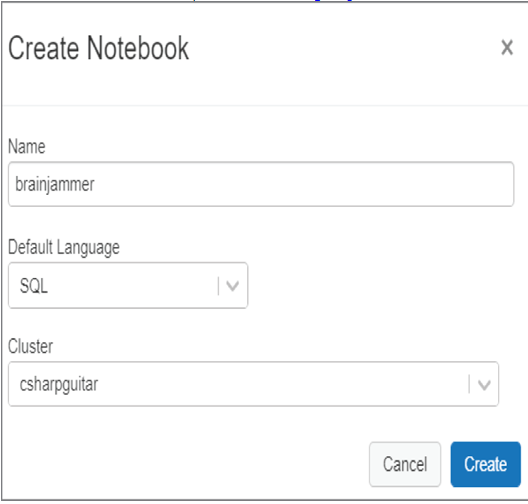
- Choose the + Create menu item ➢ click Notebook ➢ enter a name (I used brainjammer) ➢ set the default language as SQL ➢ and then click Create, as illustrated in Figure 3.66.
FIGUER 3.66 An Azure Databrick notebook
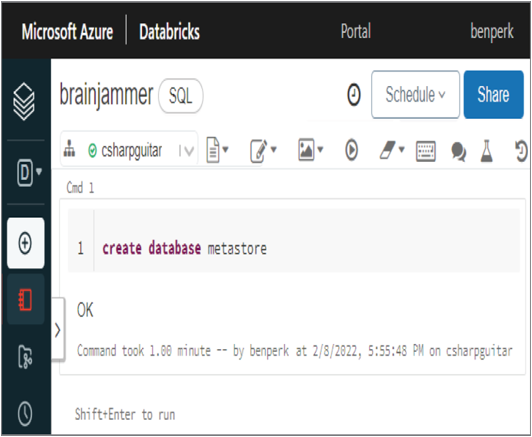
- Enter the following syntax into the command window, and then press the Run button or Shift + Enter to execute the command. If you used the BACPAC file to set up the brainjammer database, be sure to ensure that the name of the database matches the configuration you provided in the options file; otherwise, you might receive a SQLServerException error.
create database metastore - When the code snippet is successful, an OK result will appear, as shown in Figure 3.67. Consider running show databases or show tables from , replacing with your database name from Exercise 2.1.
FIGUER 3.67 Azure Databricks Notebook command
Refer to Figure 3.65, specifically the Cluster Mode drop‐down. Table 3.13 describes the options available.
TABLE 3.13 Azure Databricks cluster modes
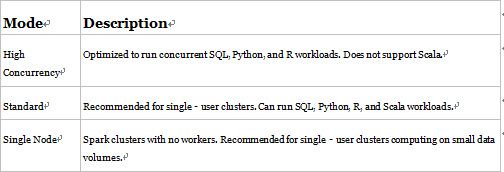
If your data analytics requirements necessitate a lot of computation and transformation resources, then choose the High Concurrency cluster. This mode provides the greatest resource capacity and reduces query latencies. Scala does not support running user code in separate processes, but this is the way that the High Concurrency cluster achieves massive scale. SQL, Python, and R do support running user code in separate processes. A process, in this context, is synonymous with a program or executable. When processes are spun up by the operating system kernel, they are allocated protected memory address ranges, load dependencies, and spawn threads to execute code. It is a relatively complicated feat to make cross‐process application calls, and the code must support it. If you need Scala or do not need such massive compute resources, then choose the Standard mode. Standard mode requires at least one cluster to perform data computations. If you are developing or testing some small transformations, then choose the Single Node mode. When you provision Azure Databricks, a driver node is provisioned to help perform small tasks. No cluster is required with Single Node; instead, the small computations are executed on the driver node.